 Important: Following this tip requires editing the Windows Registry, a procedure that can result in a corrupted Windows installation if not completed properly.
Therefore, if you follow the steps listed below, you do so at your own risk and agree that it will not be my fault if your favorite TV show gets canceled, the wind blows over your favorite tree or your computer becomes unbootable or unstable.
If you decide to proceed, then I recommend creating a System Restore Point first just to be on the safe side. If you’re still with me, lets get started…
If it seems like it takes forever for your PC to shut down when you’re waiting for it to power off or restart, you aren’t alone. Along with a snail-like startup time, a lengthy shutdown time is one of Window’s biggest annoyances for many of us.
There are several things that affect the length of time it takes for Windows to shut down, and most of them are out of our control. But there is one of those factors that we can control with a simple registry tweak. It’s called WaitToKillServiceTimeout, and it does just what its name implies: It sets the length of time that Windows will wait before it forces a hung process to close so it can begin the shutdown process.
Microsoft ‘s WaitToKillServiceTimeout default setting can easily be changed to a shorter time interval, resulting in faster system shutdowns and restarts. Here’s how (works with all versions of Windows):
1 – Open a “Run” box by pressing the Windows + R keyboard combination.
2 – Type regedit and press the Enter key in order to open the Registry Editor.
3 – Make a backup of the Registry by clicking File > Export. Give the backup a name and save it to the Desktop.
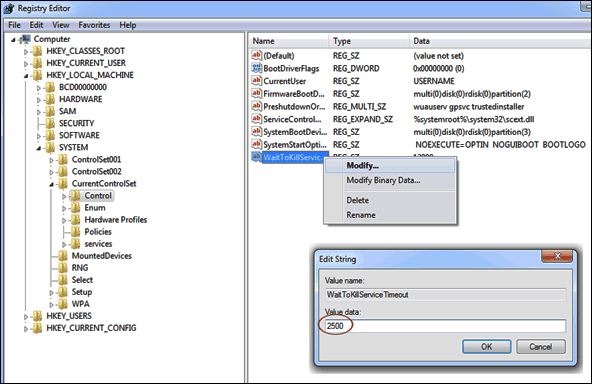
4 – Navigate to HKEY_LOCAL_MACHINE\SYSTEM\CurrentControlSet\Control
5 – In the right-hand pane, right-click on WaitToKillServiceTimeout, the select Modify from the drop-down list.
6 – Change the data value to 2500, then click Ok. This will lower the amount of time Windows will wait before closing a hung process to just 2 and half seconds. Here’s a screenshot:
7 – Click File, then Exit to close the Registry Editor.
There you go! If your favorite TV show is still on and your favorite tree is still standing, your PC should shut down considerably faster from now on!