 A decade ago, building a home theater meant hiring a specialist, running conduit through your walls, and writing a check that made your eyes water. That era is over.
Today’s equipment is designed for regular people. Speakers connect wirelessly. Projectors auto-correct their own image. AV receivers walk you through setup with on-screen guides. If you can mount a shelf and plug in a few cables, you can build a home theater that sounds and looks incredible.
The secret is treating your audio visual equipment installation as a weekend project with clear steps, not a single overwhelming task. Don’t try to wire everything in one frantic afternoon. Start with the display. Add sound. Then connect and calibrate. Each phase builds on the last, and each one gives you a working system you can enjoy while you plan the next upgrade.
This approach works because modern components are built to play nicely together. HDMI carries both picture and sound in a single cable. Receivers auto-detect what’s plugged into them. Even surround sound speaker kits come with color-coded wiring now. A complete beginner can build a setup that rivals professionally installed systems. You just need a plan and a free Saturday.
Choosing the Right Room and Planning Your Layout
Before you buy a single piece of equipment, spend thirty minutes in your room. It will save you hours of frustration later.
Size matters. A massive 85-inch TV overwhelms a small bedroom. A modest soundbar gets lost in a large open basement. Match your gear to your space. Measure the distance from where you’ll sit to where the screen will go. For a TV, the general rule is sitting 1.5 to 2 times the screen’s diagonal measurement away. For a projector, you’ll need to factor in throw distance, which is how far the projector sits from the screen.
Think about light. A room with big south-facing windows will fight a projector during daytime viewing. Heavy curtains or blackout shades solve this, but it’s worth knowing before you commit. Also consider where your power outlets are and whether you have a clear path for running cables along walls or under carpet edges.
Sketch a simple layout. It doesn’t need to be fancy. A rough drawing showing your screen position, seating, speaker locations, and cable routes will make every decision that follows easier.
Picking Your Display — TV vs. Projector
This is the first big choice and it comes down to your room, your budget, and what kind of experience excites you.
When a Large Screen TV Makes More Sense
If your room gets a lot of natural light, a TV wins. Modern LED and OLED panels push enough brightness to look stunning even with the blinds open. They’re also simpler. Unbox, mount or place on a stand, plug in. No screen to hang, no throw distance to calculate, no bulb to replace down the road. For rooms under 15 feet deep, a 65 to 85-inch TV delivers a genuinely cinematic feel at a price that keeps dropping every year.
When a Projector Gives You the True Cinema Feel
Nothing replicates the feeling of a 100-plus-inch image filling your wall. That’s where projectors shine. Modern 4K projectors have gotten remarkably affordable, and the picture quality is stunning in a controlled-light room. You’ll need to account for throw distance. Most standard projectors need 10 to 15 feet between the lens and the screen. Short-throw models cut that to just a few feet, which opens up smaller rooms.
Pair your projector with an ambient light rejection screen if you can’t fully darken the space. It makes a dramatic difference. And don’t worry about bulb life. Laser projectors now last 20,000 hours or more. That’s years of movie nights before you even think about maintenance.
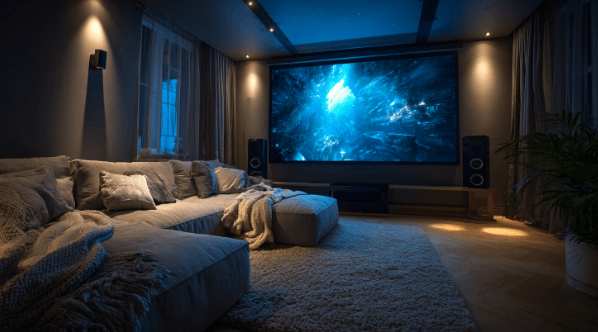
Building Your Sound System Step by Step
A great picture is only half the experience. Sound is what makes you feel like you’re inside the movie. Build it in stages, and you’ll never feel overwhelmed.
Starting Simple With a Soundbar and Subwoofer
If you’re just getting started, a quality soundbar paired with a wireless subwoofer is a massive leap from your TV’s built-in speakers. Dialogue gets clearer. Bass actually exists. Some soundbars now simulate surround sound using upward-firing drivers and room reflection. It’s not the same as dedicated speakers, but for a single-box solution the results are impressive.
Moving Up to a 5.1 Surround Sound Setup
When you’re ready for the real thing, a 5.1 system gives you five speakers and a subwoofer. You’ll need an AV receiver to power and manage everything. Don’t let that intimidate you. Modern receivers have setup wizards that guide you through each connection. Run your front left and right speakers to either side of the screen. The center channel goes directly below or above it. Surrounds sit to the sides of your seating position, slightly above ear level. Cable management clips along baseboards keep things tidy.
Understanding Speaker Placement for the Best Sound
Placement makes or breaks a surround system. Your center channel handles most dialogue, so aim it directly at listening height. Front speakers should form an equal triangle with your seating position. Surrounds work best at 90 to 110 degrees to your sides. And the subwoofer? Corner placement usually delivers the strongest bass, but experiment. Move it around and sit in your spot until you find where it sounds fullest.
Connecting Everything Without the Cable Chaos
Use HDMI for everything that supports it. One cable carries 4K video and surround audio, which keeps things simple. Run all your sources into the receiver, then a single HDMI out to your display. Label every cable at both ends with a small piece of tape. In the future, you will be grateful.
Velcro cable ties and adhesive raceways cost almost nothing and turn a rat’s nest into something clean. If you’re running cables across a room, flat speaker wire can tuck under area rugs invisibly.
Calibrating Your Picture and Sound for the Best Experience
Don’t skip this step. It’s where good becomes great.
For your display, turn off all motion smoothing settings. They make films look like soap operas. Set the picture mode to Cinema or Movie. Adjust brightness until dark scenes show detail without looking washed out.
For sound, run your receiver’s auto-calibration. Most systems include a microphone that you place at your listening position. The receiver sends test tones to each speaker, measures the response, and adjusts levels and distances automatically. It takes five minutes and the difference is night and day.
Common Beginner Mistakes That Are Easy to Avoid
Skipping room acoustics is the biggest one. A great speaker system in a bare room with hard floors and empty walls will sound harsh and echoey. Add a rug, some curtains, even a bookshelf. It helps more than you’d expect. Other common missteps include placing surround speakers too high, forgetting a surge protector for expensive electronics, and buying a receiver that doesn’t have enough HDMI inputs for all your devices. Check the specs before you buy.
When It Might Be Worth Calling In the Experts
A basic home theater is absolutely a DIY project. But some ambitions go beyond a weekend with a drill and a cable box. In-wall speaker wiring, ceiling-mounted projector installs, and multi-room audio systems. These demand precision, specialized tools, and sometimes structural knowledge that YouTube tutorials can’t fully replace.
That’s where professionals earn their fee. New York Soundproofing handles full home theater installations alongside acoustic optimization, making sure the room itself performs as well as the equipment inside it. If you want a flawless result without the trial and error, their team takes the project from planning through calibration, so you can skip straight to the part where you press play.