![]()
Important update: Chrome and Firefox have both started flagging the tool I recommend in this post as malware. I believe this to be a clear case of a false positive but I have removed the links just to be safe.
Original post continues below…
Do you have sensitive files that you’d rather not let others have access to (such as your resume or your banking and credit card information) stored on a shared PC? These days you just can’t be too careful about protecting your personal information from the prying eyes of others.
The best way to protect your sensitive files from unauthorized use is to place them in a password protected folder, but unfortunately Microsoft Windows doesn’t provide a way to do that (you’d think they would have thought of it by now!).
It sure would be nice to be able to right-click on a folder and click something like “Protect this folder with a password”, but no such luck.
But there are several third party utilities out there that will let you password protect your files and folders, and some of them carry a fairly hefty price tag. But as luck would have it one of the best of the lot is absolutely free.
It’s called Folder Hidden, and here is how to use it to protect your own private files from prying eyes:
1 – Download Folder Hidden and install it on your PC.
2 – Open the Folder Hidden program. The first time you use it you’ll be asked to enter a password. DO NOT forget or lose your Folder Hidden password because it will serve as the one and only gatekeeper to all of your hidden/password protected files.
3 – Once the program is loaded, click on the Hide Folder button.
4 – Navigate to the folder you wish to protect, select it with your mouse, then click OK. That folder is now hidden from within Windows Explorer and it cannot be seen by any programs. You can search for it in Windows Explorer if you wish to verify that it cannot be seen. Repeat this process for every folder you wish to protect. Here’s a screenshot:
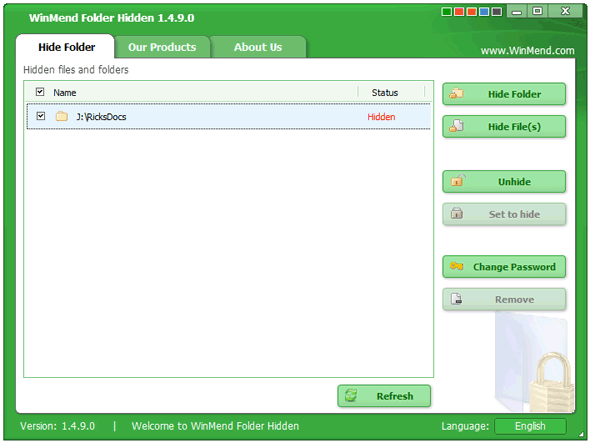
5 – To access a folder that you have hidden, all you need to do is run Folder Hidden again. Right-click on the folder you wish to access and click Unhide. Once you’re finished working with the files in that folder you can quickly hide it again by checking the box beside the folder name and then clicking the Set To Hide button.
If you ever decide that you no longer need to protect a folder, simply unhide it and click the Remove button.
Very important: Remember what I said about not forgetting your password for opening the Folder Hidden program. Without that password your folders will remain hidden forever, even from you!
Bonus tip: This post explains how to make Windows start up with your last-used programs and websites already open.
If you think your friends would like this post, I’d love you to share it! Thanks a bunch!